|
Laser
Science Projects
Intermediate
Laser Science Projects
The Laser
science projects on this page are at the intermediate level and require
more equipment and parts to construct than the basic projects.
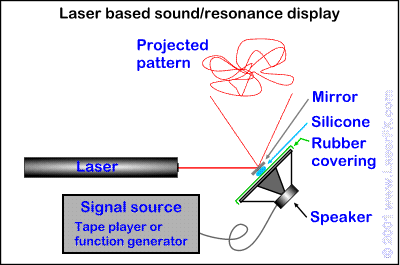
Laser
based display of sound and resonance
The
set-up used in this project is similar to the ones used in some consumer
and hobbyist 'laser light show' systems. You will need the
following parts:
PARTS
A HeNe or diode laser (you can use a laser
pointer)
A small loudspeaker and a board to mount it
A rubber glove
A small lightweight front surface mirror (preferably circular)
Some silicone glue or caulking
A source of sound to drive the speaker such as a small radio or tape
player. To demonstrate resonance a sine wave oscillator or function
generator is needed.
Cut the rubber glove open up one
side so as to make as large a flat piece of thin rubber as you can.
Stretch the rubber glove tightly over the front of the speaker and
secure it with silicone glue or wire. Carefully make a blob of
glue in the centre of the rubber over the speaker and allow it to dry
for several hours; then put a thin film of silicone on the back of the
mirror and attach it to the dried blob of silicone on the rubber and allow the whole thing
to dry overnight.
Mount the loudspeaker assembly with the mirror onto a piece
of lightweight board. Arrange the laser so that when it is shone
onto the mirror, the beam will be deflected onto a clear area of a wall
or screen. When sound is fed through the speaker the laser will trace a
pattern on the wall visualising the music.
- Do the patterns on the wall bear any fixed
relationship to the sounds on the tape?
- What happens when you vary the volume?
- Do different tones produce different patterns and
is there a relationship between the tones and the patterns?
Replace the sound source with a signal
generator or sine wave oscillator; adjust the output to a 100 Hz sine
wave and observe the image on the wall. Now adjust the frequency to 200
Hz and observe the pattern - continue this at 100 Hz intervals until you
get to 2,000 Hz. Now try sweeping the frequency slowly up and down while
observing the pattern.
- Do different tones produce different patterns and
is there a relationship between the tones and the patterns?
- Is the relationship fixed?
- Are there any frequencies where the pattern
suddenly and drastically changes? If so, why is this?
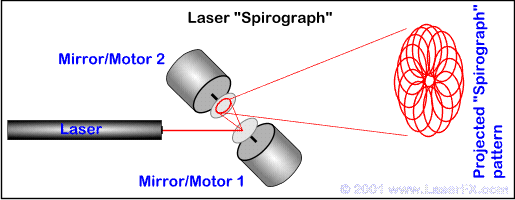
Laser Spirograph
The set-up used in this project is also
similar to the ones used in some consumer and hobbyist 'laser light
show' systems. You will need the following parts:
PARTS
A HeNe or diode laser (you can use a laser
pointer)
Two small DC motors and hardware to mount them
Two variable voltage DC power supplies for the motors (model train
power supplies work well)
Two small lightweight front surface mirrors
(preferably circular)
Some 5 minute epoxy glue
You will need
two DC motors that can rotate at speeds between 300 and 3,000 RPM and
two independent DC power supplies. Model train transformers work well
for this application as the more modern ones use pulse width modulation
to control the speed of the trains.
Obtain two thin, round Front surface
mirrors at least 12.5 mm [1/2"] in diameter. Mount these on the
ends of the motor shafts with epoxy glue. When you mount then. you
don't want then exactly square and true to the shafts, you want then
very slightly tilted so that a laser reflected from the spinning mirror
will draw a small circle. If you have access to a lathe, you can fashion
a mount that allows you to adjust the 'tilt' of the mirror and thus the
size of the circle that it will draw.
Once the mirrors are mounted
and the glue has dried, place the motors on mounting brackets so that
the mirrors face each other with a short distance [25mm - 1" or
less] between them. The motor/mirror assemblies should also be mounted
in such a way that the angle between them can be adjusted. Send the
laser beam into the first mirror and start it rotating. Now adjust the
angle (and possibly the distance) of the first motor/mirror assemble so
that the circle it is projecting falls onto the mirror of the second
motor assembly. When this step is complete, start the second mirror
spinning and adjust the angle of the second assembly so that the pattern
is projected without hitting any part of the first mirror/motor assembly
[see diagram].
Varying the
speeds of the motors with their mirrors causes different "Spirograph"
type patterns to be projected onto the wall.
-
When you change the speed of the motors, what
parameter of the resulting circles that they project are you controlling?
-
Run motor 1 at a fixed speed and vary the speed of
motor 2 while observing the pattern. Is there a relationship
between the image and the speed at which motor 2 is rotating?
-
Is this relationship fixed?
-
Can you derive a mathematical formula that will
allow you to predict the type of pattern you get from this apparatus?
-
Since the exact speed of the motors is unknown, can
you derive a formula that will allow you to predict the difference
in speed between the first and second motor based on observing the
projected patterns?
Parts Sources
The most important part you
will need is a laser. Most High School science departments will have a
HeNe laser and you may be able to use it - ask your teacher. You can
also obtain HeNe lasers from on-line vendors, surplus
houses, and from ads in electronics magazines.
You can use a 'laser pointer' for these projects - small
pen shaped devices with a laser diode mounted in one end. These
are available from AV companies and stores like Office Depot, Office Max, Radio Shack and Staples.
Optics parts such as front surface mirrors and
beamsplitters can be obtained from on-line vendors as well as from
some electronics surplus houses.
Electronics parts can be obtained from suppliers such
as Radio Shack or a local electronics vendor.
Simple mounts for the parts or mirrors can be fabricated
from wood or angle brackets obtainable form hardware vendors such as
Home Depot or Builders Square.
[ Introduction
| Bibliography | Glossary of
Terminology | Laser
safety overview | Other
applications of lasers | Selected
laser
related web sites | Basic laser
science projects | Intermediate
laser science projects | Advanced
laser science projects | Illustrations
for laser science projects ]
|